# Installation
## Step 1: Install Python
### Install Python 3 (Windows)
Best to download and launch the Installer from the official page: [https://python.org](https://python.org/) > `Downloads` > `Download for Windows`
During installation, activate the `Add Python 3.xx to PATH` option (where `.xx` refers the version you downloaded), and then `Install Now`.
### Install Python 3 (Mac)
Mac has Python 2 installed by default. You will not be able to follow this tutorial with Python 2, so you should get Python 3. To install Python on Mac, you have two options.\
\
Go to , scroll down to "Looking for a specific release?" and select the latest version of Python 3.6. You'll be redirected to another page where you scroll down to "Files" and click on "macOS 64-bit Installer" or "macOS 64/32-bit Installer" depending on your machine's architecture. After it's finished downloading, fire up the installer and follow the instructions.\
\
Or, if you have Homebrew installed, you can just `brew install python`
### Install on Linux
If you're on Linux, then you should already have Python 3 installed. But, just in case, open the Terminal and run `python3 -V` if the output starts with 3.6, you're good to go. If it starts with 3.5, that's fine too.
If you do not have Python 3 installed, then follow the instructions below for your distribution.
Ubuntu: `sudo apt install python3.6`
Fedora: `sudo yum install python3.6`
Arch Linux: `pacman -S python`
For others, you can either look it up with Google or build from source.
## Step 2: Install PIP package manager
### Install pip
**PIP** is a package management system used to install and manage software packages written in Python. It stands for “preferred installer program” or “Pip Installs Packages.”
**PIP for Python** is a utility to manage PyPI package installations from the command line.
If you are using an older version of Python on Windows, you may need to install PIP. You can easily install PIP on Windows by downloading the installation package, opening the command line, and launching the installer.
#### Before you start: Check if PIP is Already Installed
1\. Launch the command prompt window:
* Press **Windows Key + X.**
* Click **Run.**
* Type in **cmd.exe** and hit enter.
Alternatively, type **cmd** in the Windows search bar and click the “Command Prompt” icon.
2\. Type in the following command at the command prompt:
```
pip help
```
If PIP responds, then PIP is installed. Otherwise, there will be an error saying the program could not be found.

### Installing pip on Windows
1\. Launch a command prompt if it isn't already open. To do so, open the Windows search bar, type **cmd** and click on the icon.
2\. Then, run the following command to download the **get-pip.py** file:
```
curl https://bootstrap.pypa.io/get-pip.py -o get-pip.py
```

To install PIP type in the following:
```
python get-pip.py
```

If the file isn’t found, double-check the path to the folder where you saved the file. You can view the contents of your current directory using the following command:
```
dir
```
Once you’ve installed PIP, you can test whether the installation has been successful by typing the following:
```
pip help
```
If PIP has been installed, the program runs, and you should see the location of the software package and a list of commands you can use with **`pip`**.

If you receive an error, repeat the installation process.
#### Add Pip to Windows Environment Variables
To run PIP from any location, you need to add it to Windows environment variables to avoid getting the "not on PATH" error. To do so, follow the steps outlined below:
1. Open the **System and Security** window by searching for it in the **Control Plane**.
2. Navigate to **System** settings.

3\. Then, select **Advanced system settings**.

4\. Open the **Environment Variables** and double-click on the **Path** variable in the **System Variables**.

5\. Next, select **New** and add the directory where you installed PIP.
6\. Click **OK** to save the changes.
#### Upgrade pip to the latest version
New versions of PIP are released occasionally. These versions may improve the functionality or be obligatory for security purposes.
To check the current version of PIP, run:
```
pip --version
```

To upgrade PIP on Windows, enter the following in the command prompt:
```
python -m pip install --upgrade pip
```
This command uninstalls the old version of PIP and then installs the most current version of PIP.
### Install Pip on macOS via get-pip.py
The **`get-pip.py`** method installs pip via the command line. The script automatically downloads and installs the pip package for Python.
{% hint style="info" %}
**Important:** Install pip via **`get-pip.py`** only with Python3 or later. This method doesn't work for earlier versions. Learn [how to upgrade to Python3](https://phoenixnap.com/kb/upgrade-python#ftoc-heading-4).
{% endhint %}
Follow the steps below to install Pip:
1\. Press Command + Space Bar and type in *Terminal*. Click the app icon to open a new terminal window.
2\. Check your Python version to make sure **Python3** is installed:
```
python3 --version
```

3\. Download pip by running the following command:
```
curl https://bootstrap.pypa.io/get-pip.py -o get-pip.py
```
The [curl command](https://phoenixnap.com/kb/curl-command) allows you to specify a direct download link. Use the **`-o`** option to set the name of the downloaded file.

4\. Install the downloaded package by running:
```
python3 get-pip.py
```
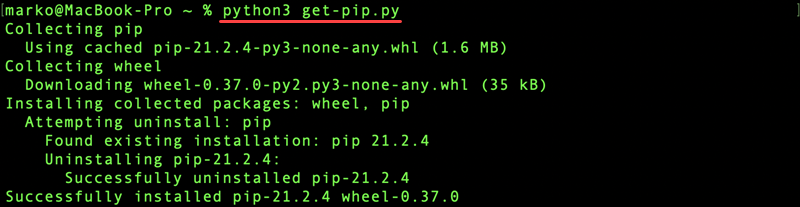
Wait for the installation to finish. Now you have successfully installed pip on your Mac.
### Install Pip on macOS via brew
Another method to install pip on macOS is through Homebrew, an open-source package manager.
Make sure you have Homebrew installed by running the following command:
```
brew install python
```
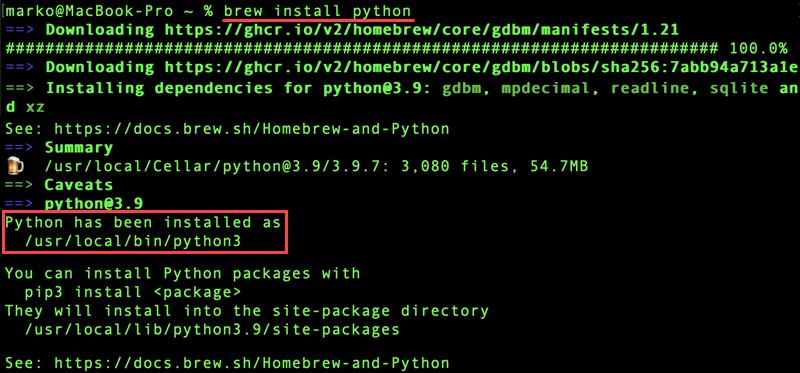
The command installs the latest Python, pip, and **`setuptools`**.
{% hint style="info" %}
**Note:** If pip is still not in your path after installing via brew, the solution is to re-link. Run **`brew unlink python && brew link python`**.
{% endhint %}
Since macOS already comes with Python preinstalled, the command installs a **separate copy of Python**. Having a separate installation has several benefits:
* The Python2 version shipped with macOS is out of date compared to the latest official Python3 release.
* Having a separate Python version adds a layer of protection to your system.
### Install via ensurepip
Since version 3.4, Python can install pip with no external commands or internet connection needed.
Open a terminal and run the following command to install pip via **`ensurepip`**:
```
python3 -m ensurepip --upgrade
```

The **`ensurepip`** command creates a similar pip installation to **`easy_install`**.
#### Verify Pip Installation
To verify that you have installed pip correctly, check the pip version on your system.
Open the terminal and enter:
```
pip --version
```

The output shows which pip version you have on your computer.
## Step 3 : Install Requirements
In order to use the launcher you must now use pip to install the required packages. This is done in all operating systems by navigating to the directory where you have the included requirments.txt file via the terminal. You can do this by navigating to it in file explorer and then typing CMD in the address bar then hitting enter.

Run the following command:
```
pip install -r requirements.txt
```